USING REMOTE SOFTWARE VIA CITRIX
Running ESRI ArcInfo Applications with Citrix
This page describes how to access ArcInfo applications from a Citrix server. You will need your Citrix server ID and password to follow these instructions.
Installing the Citrix Client
- Log in as an administrator on your computer if you haven't already.
- Go the http://www.citrix.com. Choose the 'Download' link at the top of the page. Choose 'Clients' on the left part of the page. You want the 'Citrix Presentation Server' client for your operating system. As of 3 July 2007 the version is 10.1. You want the "Client Package Version 10.1" The file you download will be called 'Ica32Pkg.msi'.
- Navigate to the Ica32Pkg.msi file and double-click it.
- Follow the rest of the directions. You may have to re-start your browser.
Accessing Citrix Applications
- Again, navigate to https://www.mgis.psu.edu/ with your favorite browser. [Note that, depending upon which browser you use, the Citrix Web Interface page's Message Center might errnoeuously state that you "You do not have the MetaFrame Presentation Server Client for (Plug-in) for 32-bit Windows installed on your system." If you know it's installed, ignore this message.]
- Log into the site with the Citrix ID and password supplied to you by your instructor.
- You should see a box like the one below:
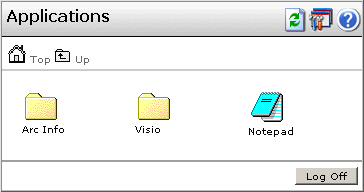
- Go into the ArcInfo directory by clicking it. Then start ArcCatalog or ArcMap. In ArcCatalog, in the catalog view on the left, you should see among others the "N"
drive. Navigate to "N:\Courses\Geog586" and you will see your course
folder listed. From there, navigate to the desired sub-folder.
At this point your instructor will supply application-specific information on your project(s). Before you leave this page, however, be sure to read the important information below regarding your password!
Changing your password on the MGIS server
- Start any Citrix application, such as ArcMap.
- Make sure the application you started above is the active application and hold down the Control key and hit F1. You'll
be presented with following dialog box:
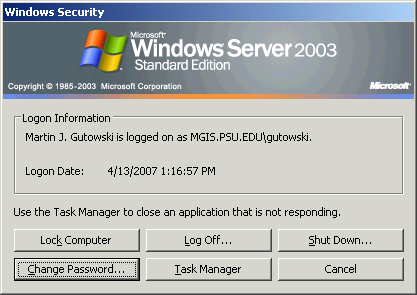
- Click "Change Password." You'll see the following box:
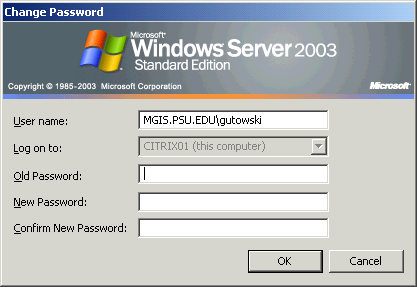
- Type your current password, the one supplied by your instructor, and they type in your new password of choice, twice. The following rules apply to new passwords: Make sure the password is at least 8 characters. Include upper and lower case letter, a number, and a special character, such as a question mark, exclamation point, etc. These stringent rules are needed because the server faces the internet, and automated attempts to hack the system are made every day. Passwords which do not follow these rules may be rejected by the system. After, click 'OK.' You'll be notified that the change was successful.
Uploading files to the Citrix server
You probably will need to upload some files from your desktop to the Citrix server, in order to do your final project if nothing else.
1. First you need to download the VPN client at downloads.its.psu.edu. You'll need to login with your access account and password. If you're currently logged into ANGEL, it should be automatic.
2. On the downloads page choose 'Connecting to Penn State.' Then pick 'VPN - Virtual Private Network.' Download the windows client and install it. You'll need to be an administrator to do that. You may have to reboot.
3. Once it's installed start it and you'll see a list of preset connection entries. Choose 'EMS-from-ISP' and click the 'connect' button. You'll be prompted for you access id and password.
4. Once you connect you're inside the EMS firewall. You can now connect to
our Windows shares. There is a share on the Citrix that holds your folders
for your courses.5. You can map a network drive to the share, if you wish. In Windows Explorer choose
Tools > Map Network Drive. Pick a drive letter to your liking. In the
folder box type:\\citrix01.mgis.psu.edu\courses
Click 'different user name', your username is the same one you use for Citrix.
Type it in this way:MGIS\abc123
and then your password.
You should see directories named after your courses. Go into the appropriate
one and find the semester. Once your inside that directory you'll need to
find your personal directory. That will be in N:\Courses\Geog586\students\you123Once you're in your own folder you can drag and drop files.
If you run into difficulties, contact your instructor or Marty Gutowski.